CACHITOS -English version

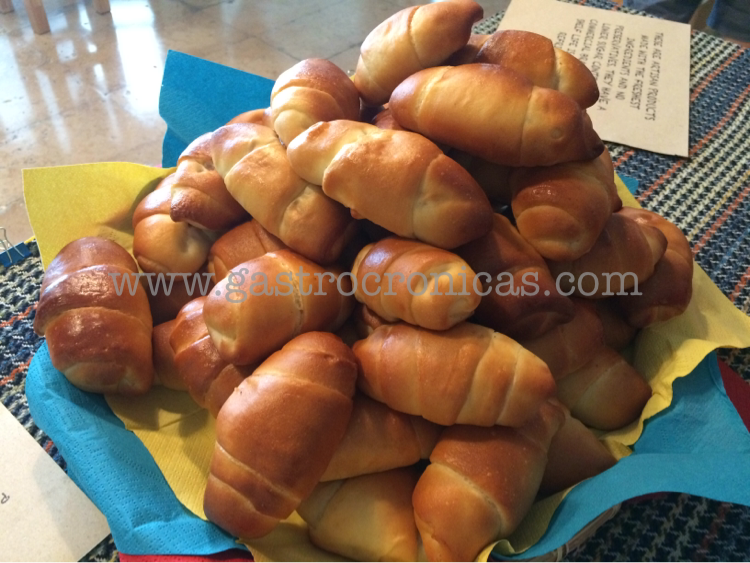
I put it off for as long as I could, but finally I’ve decided to translate some of the recipes into English, beginning with the Venezuelan ones.  A couple of months ago there was an End of Summer Party at Diego’s crèche, and I made some “cachitos de jamón”.  The literal translation would be something like little ham horns, a sweetish bread rolled like a croissant and filled with ham (or turkey, or ham and cheese –use your imagination).  I couldn’t have imagined how popular they’d become.  Some friends have asked me for the recipe, so here it is, with some history as to where they come from and how important they are to Venezuelans.  As you know, English is not my first language, so please forgive any grammatical atrocities you may find below…

 
* * * * *
 
The list of things that make a Venezuelan expat homesick is long: family, the beach and the good weather, the Ávila hill (if s/he’s from Caracas), partying for no good reason, the easygoingness towards the law, cheap gas…  But the very thing that we miss the most, even more than our own mothers, is a ham horn.
 
The cachito, diminutive of horn, is a sweetish yeasted bread (though not terribly sweet) which is traditionally filled with minced ham.  We never make it at home.  We go to any of the countless bakeries in any corner of Venezuela, get a cachito and a coffee and have a lovely snack.
 
I’m not sure about its origin.  I presume it was the creation of some nameless Portuguese genius at some point in the early 20th century.  For those of you unfamiliar with our history, a little context: at the end of the 19th century and during the first half of the 20th, Latin America received several migratory waves coming from Europe, mainly Spain, Portugal and Italy.  In Venezuela, the Portuguese immigrants began to open bakeries (among other things), and they mixed the flavours of their homeland with ours.  The result is wonderful, albeit little known abroad.  Both savoury and sweet bakery in Venezuela are outstanding, if I may say so myself!  
 
Here you have my personal recipe for cachitos, very close to the real deal you get in bakeries.  It looks lengthy, but they’re really easy to make.  I hope you like it!
INGREDIENTS
 
For 32 horns
 
1 tablespoon fast action dried yeast (or a 7 g / ¼ oz sachet)
½ cup white sugar
1 teaspoon salt
½ cup melted butter or vegetable oil (NOT olive oil)
¾ cup milk
4½ – 5 cups all-purpose flour (plus a little extra to dust)
2 eggs, lightly beaten
800 g / 1.8 lb / 28 oz wafer-thin ham, finely chopped (I recommend using ham with added water)
1 egg, to brush
2 tablespoons molasses, grated (or muscovado sugar)
 
  • In order to activate the yeast, warm up ¼ cup of water and dissolve 1 tablespoon of the sugar.  Sprinkle the yeast and stir to dissolve.  Let it rest for 10-15 minutes until froth forms on top.
    • Remember the water can’t be too hot as it kills the yeast.  If the water and yeast mixture doesn’t form froth, it means the yeast doesn’t work.
  • In a big bowl, lightly beat the two eggs until they are well blended.  Add the milk, the rest of the sugar, melted butter (cooled down a bit so that the heat doesn’t cook the eggs) and salt.  Mix in the yeasted water and add the flour one cup at a time, mixing really well (especially the first two cups) in order to dissolve any lumps.


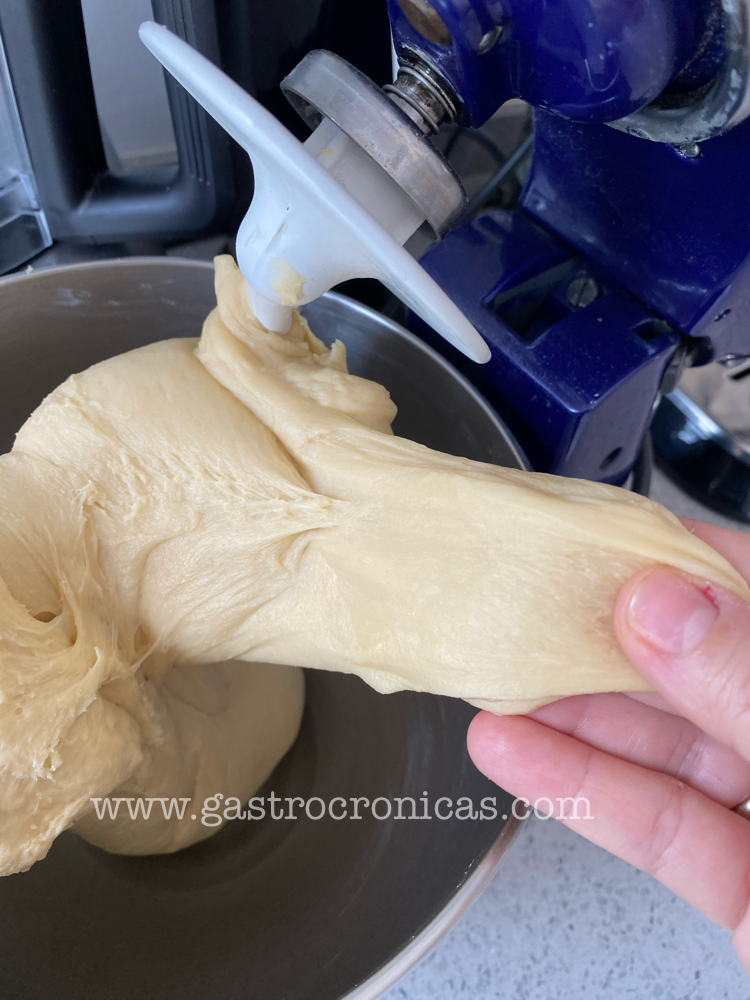
  • Once all the flour is added, you can either knead it using an electric blender with a kneading hook or by hand.
    • If using a blender, just leave the dough in the bowl and knead at low to medium speed for 5-8 minutes, until the dough is smooth and elastic.
    • If by hand, dust the kitchen top with some flour and pour the dough.  Knead it vigorously for 8-10 minutes or until you get a very smooth and elastic dough.  You may need to add some more flour as you knead, but do it a spoonful at a time, so that the dough doesn’t dry up.  After some kneading, the dough shouldn’t stick to your fingers.
    • The exact amount of flour depends on the brand you use (some are finer than others and tend to absorb more liquid), or on the size of the eggs.  I usually use medium sized eggs, and end up using a bit over 4½ cups of flour.  If, on the other hand, you notice the dough is too dry, just add a bit of milk. 
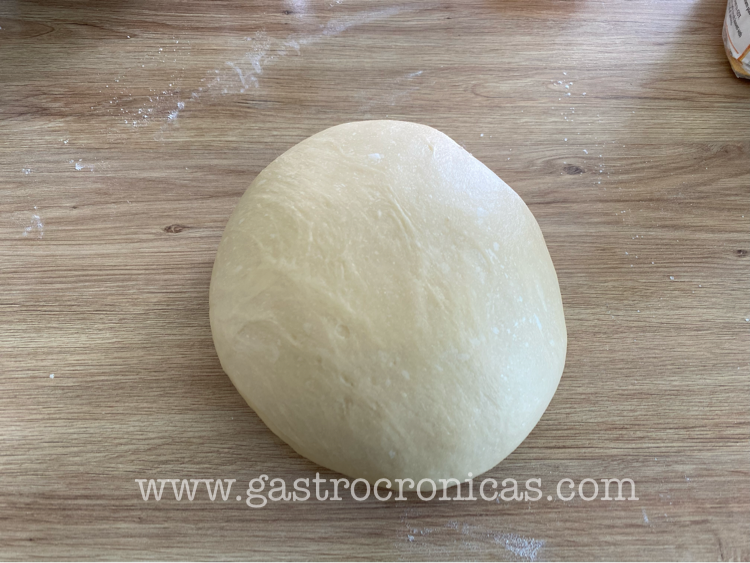
  • Once the dough is kneaded, put it back on a big (clean) bowl and cover it with a moist tea towel.  Let it rest inside the oven (switched off!) for 1½-2 hours.  The dough should double its size.
    • It seems like a lot of time to wait, but you have to allow for the yeast to do its job.  Don’t rush it and don’t add more yeast than what’s called for.  By allowing the dough to grow, you’ll get spongy and soft rolls.
  • Once the dough doubles size, lightly dust the working surface and pour the dough back on the table.  Using the tip of your fingers or your knuckles, gently punch the trapped air out until it’s back to its original size.  Make a flat disc with the dough and divide it in 4 equal portions using a sharp knife.
  • Work with one portion at a time.  Try to make a nice round ball with the portion of dough and dust a rolling pin.  Flatten the ball trying to keep a uniform round shape until it’s around 25-30 cm / 10-12 inches in diameter.  Don’t worry if the circle isn’t perfect.  The thickness of the dough is really up to you (you’ll get thinner but bigger cachitos, or smaller but more doughy ones).  Just be careful not to thin them out too much, as they may break when you bake them.
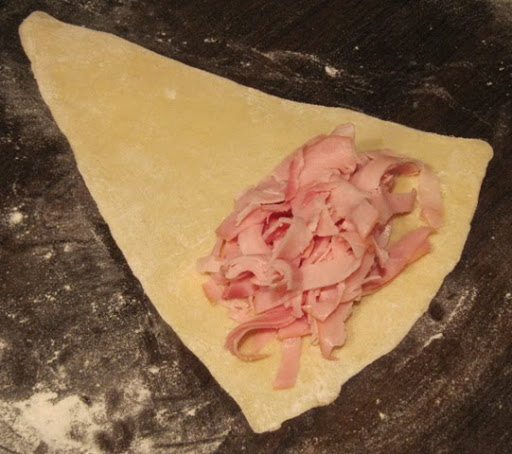
  • Once you flatten the dough, divide it in 8 portions using a sharp knife, as you would do with a pizza.  Each triangle will be a cachito.  Usually you will need to flatten each triangle a bit more with the rolling pin before putting the filling.
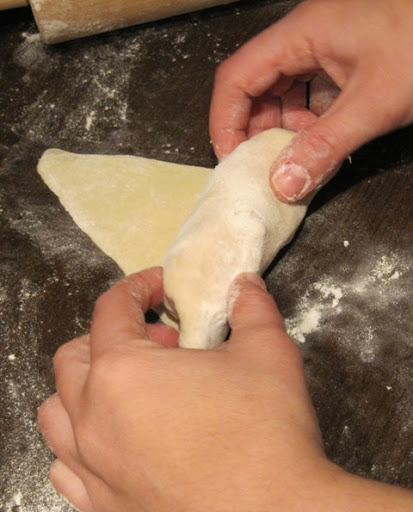
  • Place a handful of ham in the base of the triangle (adjust the amount to the size of each one) and roll it up to the vertex (assuming it’s an isosceles).  Two tricks to avoid spillage:
    • Before beginning to roll it up, fold the external borders of the triangle as if forming a pocket around the ham.
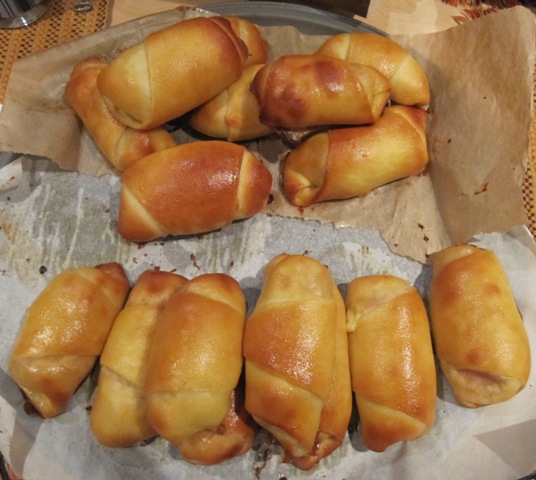
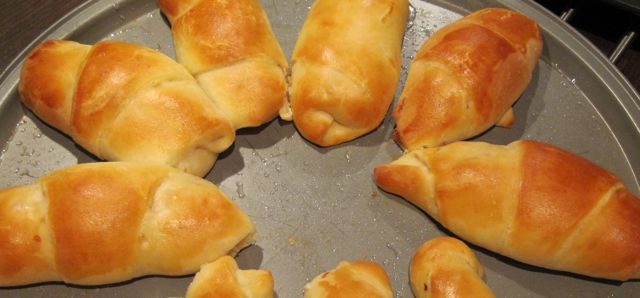
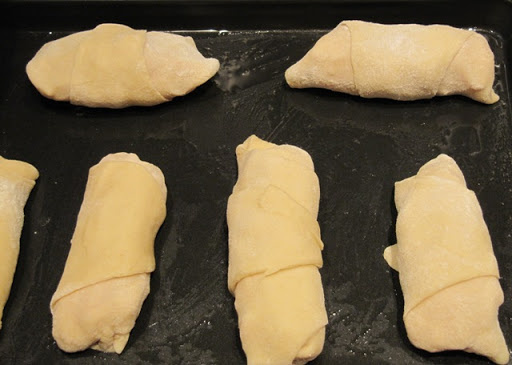
    • When placing the cachitos on a greased baking sheet, put the vertex facing down.  Leave enough space between each cachito, as they will grow considerably in the oven.
    • Originally, cachitos are only filled with minced ham, but there’s nothing wrong with experimenting a bit.  A mixture of ham (say 600 g) and grated cheese (about 300 g, edam or a mild cheddar) are great together.  Another option is using turkey ham and softened cream cheese (since turkey ham tends to be dryer than pork ham, the cream cheese gives a nice extra moisture to the roll).  When buying the ham, read the label and make sure to buy ham with added water (the other kind is way too dry and salty for this recipe).
    • The first rolls always come out horrible, but you’ll get the hang of it soon enough!
 
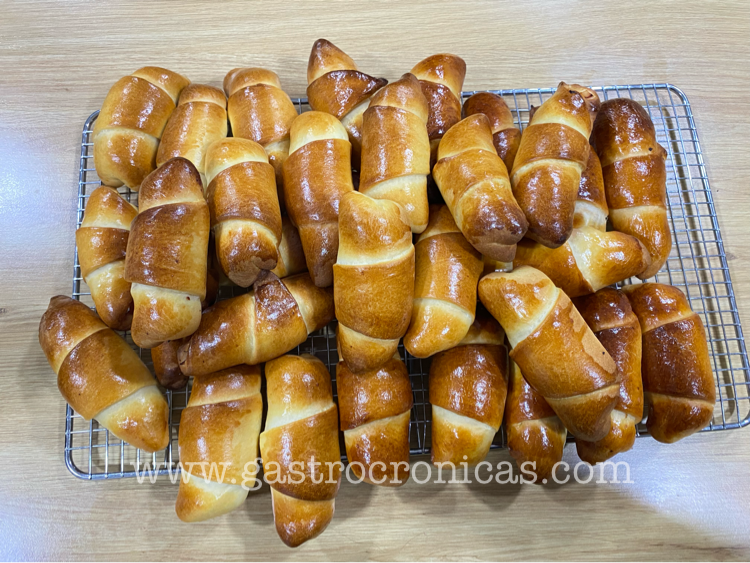
  • Once on the baking sheet, brush each cachito with a mixture of 1 beaten egg and 2 tablespoons of molasses. This will give them not only a nice golden colour (and avoid cracking), but also an extra sweetness. You’ll have some mixture left.  Save it! Let the cachitos rest for another hour in a warm place.
    • Finding molasses is not hard.  I’ve seen it sold in Tesco, but if you don’t want to buy a whole package just for this recipe, you can substitute it with muscovado sugar, which is type of dark and rich brown sugar.   
  • Preheat the oven at 175º C / 350º F.  Right before putting the cachitos in the oven, give them a second brush with the egg and molasses mixture.  Bake them for 15 minutes in the middle of the oven, until they’re golden brown.

      • Note:
        • If 32 cachitos are too much, this dough can be frozen.  Once you punch the air out, put a few drops of oil inside a plastic bag, rub it a bit and place the dough inside.  Close it tightly and freeze until you crave some cachitos again.  When you thaw it, remember to open the bag or, preferably, put the dough in a bowl, as it will grow again (though maybe not as much as the first time).


      CACHITOS DE JAMÓN

      Al exiliadx venezolanx le hacen falta muchas cosas: su familia, la playa y el buen clima, el Ávila (si es caraqueñx), la fiesta por cualquier motivo, la tranquilidad de infringir una que otra ley sin miedo a la multa, la gasolina barata… Pero, sin duda alguna, lo que más falta le hace, más aun que su propia madre, es el cachito de jamón.

      Desconozco su origen. Presumo que fue la creación de algún genio portugués en algún punto del temprano siglo XX. Para lxs gastrolectorxs no venezolanxs, un poco de contexto: a finales del XIX y durante la primera mitad del siglo XX, hubo varias oleadas migratorias provenientes de Europa, principalmente de España, Portugal e Italia. En Venezuela, lxs portugueses, entre otras cosas, se dedicaron a abrir panaderías y mezclaron los sabores locales con los de su tierra. El resultado es maravilloso, aunque poco conocido en el exterior. La panadería y repostería venezolanas no tienen igual (y lo digo con conocimiento de causa, después de haber viajado un montón por países que se precian de tener buena cocina).

      En fin, que de ahí salió el cachito de jamón: una especie de pan endulzado (pero que no llega a ser completamente dulce) que se enrolla en torno a un picadillo de jamón (y no llega a ser croissant). Lo cierto es que el aroma dulzón del cachito evoca mañanas de cielo azul, de montaña limpia, de día por empezar. Si lx gastrolector se anima a hacerlos, desayune un par con una buena taza de café con leche e imagine tiempos mejores para un país que poco a poco se va convirtiendo en una referencia remota para esta exiliada.

      * * *

      Esta receta tiene años circulando en varias páginas de Facebook, e incluso ha sido reproducida (SIN PERMISO), con fotos y todo, en algunas revistas. Obviamente si la publico es porque no me importa compartirla. De hecho, me encanta la idea de tener amigxs regadxs por todo el mundo que llevan un pedacito de Venezuela (y de mí) cada vez que la hacen. Tengo incluso unxs amigxs húngarxs que han incorporado los cachitos como menú fijo en sus fiestas de cumpleaños, y es algo que me hace muy feliz. Lo que me parece inaceptable es que se reproduzca al pie de la letra sin citar la fuente. Así que ya saben, plagiar es horrible (e innecesario).

      [Versión actualizada julio 2021]

      INGREDIENTES

      Salen 32 cachitos pequeños

      7 g levadura en polvo (un sobrecito / 1 cucharada) ó 15 g levadura fresca

      100 g huevo, ligeramente batidos (=2 huevos regulares)

      240 g / 1 taza de leche

      75 g / ⅓ taza azúcar

      610 g / 4+3/4 taza) harina para pan

      6 g / 1 cucharadita sal

      90 g / ⅓ taza mantequilla, en cubitos

      700-1000 g jamón en lonjas finas, cortado en tiritas (la cantidad depende de cuán generosos sean en cada cachito)

      1 huevo batido para barnizar

      [En mi versión antigua, sugería que se activara la levadura en un poco de agua tibia con azúcar, pero hoy en día ese paso ya no es necesario con las levaduras instantáneas. Aquí les va mi versión post Le Cordon Bleu]

      • En un recipiente grande mezclar la leche con el azúcar, la sal y los dos huevos previamente batidos. Incorporar la levadura, e ir agregando la harina taza por taza, revolviendo bien (en especial las primeras dos tazas) para que no queden grumos. Esto se puede hacer a máquina o a mano. Si están usando máquina, les sugiero agregar la mantequilla en cubitos (firmes), pero si están amasando a mano, es más fácil con la mantequilla un poco suavizada.
        • En recetas antiguas, la gente solía pedir que los líquidos estuvieran tibios para activar rápido la levadura. Yo les recomiendo empezar con ingredientes fríos (la leche, los huevos, la mantequilla). Esto garantiza que cuando terminen de amasar, con toda la fricción, la masa va a estar entre 24-26ºC. Esta es la temperatura ideal para que las masas levanten y se desarrollen a plenitud. Si la masa está más caliente, corre el riesgo de sobre crecer (overproofing).

      • Cuando esté incorporada toda la harina, amasar vigorosamente por unos 8-10 minutos (a máquina) o 12-15 minutos a mano, hasta que la masa no se pegue de los dedos. Esta masa suele ser firme y fácil de trabajar, y no necesita harina extra. Confíen en la receta y denle tiempo a la harina de absorber el líquido. La masa está lista cuando se vea suave, brillante y elástica.
        • A veces la harina es muy fina y absorbe más líquido, otras veces los huevos son demasiado grandes (más de 50 g por huevo) y le añaden más humedad al asunto. Si tienen rato amasando y sienten que de verdad está muy pegajosa, pueden espolvorear un poquito más. Si, por el contrario, notan que la masa está muy seca, le pueden agregar un poco más de leche. Pero ¡resistan la tentación! La mayoría de las veces lo que la masa necesita es tiempo. Esta receta está súper-recontra probada (con muchos tipos de harina distintos, en muchas latitudes), y las proporciones suelen funcionar bien.
      • Una vez amasada, hacer una bola compacta, poner la masa en un recipiente grande tapado con una bolsa plástica limpia (yo prefiero usar plástico que trapos húmedos) y dejar reposar. Hay dos métodos para dejar que crezca la masa: el método directo y el método controlado.
        • Con el método directo, la masa se tapa y se deja afuera hasta que casi duplique su tamaño. A la media hora de reposo, se vuelve a poner en el mesón, se saca el aire atrapado y se vuelve a formar una bola. Esto ayuda a darle estructura a la masa. El tiempo total de crecimiento o proofing depende de la temperatura y humedad de sus cocinas, y de cuánto manipularon la masa. Aquí en el Trópico, esto puede ser bastante rápido, pero en invierno, en una cocina fría, esto puede demorar hasta 4 horas.
        • Con el método controlado (mi recomendado para este tipo de masas enriquecidas, es decir, que tienen mantequilla), se forma la bola, se tapa y se deja reposar por 15 minutos afuera. Se aplasta de nuevo, se saca el aire, se vuelve a formar la bola y de vuelta al recipiente. De ahí, MUY BIEN TAPADA, se mete en la nevera por varias horas, preferiblemente toda la noche. La masa va a crecer muy lentamente, ayudando con el sabor y la estructura.
      • Una vez que crezca la masa, o que estemos listxs para armar los cachitos, enharinar muy ligeramente la superficie de trabajo, poner la masa y sacarle el aire por completo apretando con el talón de la mano. Hacer un disco plano y dividir (con cuchillo o scraper) en cuatro porciones iguales. Como yo soy bastante maniática, me gusta hacerlo con la balanza.
      • Formar una bola con cada porción. Darle una buena forma al principio, ayuda a que cada disco sea más parejo y cada cachito salga del mismo tamaño. Enharinar un poco el rodillo e ir estirando cada disco hasta hacer un círculo de unos 25-30 cm de diámetro (el grosor depende del gusto personal: si a usted le gustan esos cachitos medio transparentes y grandes, entonces estire bien la masa; por el contrario, si usted es de esos que disfrutan del gusto dulzón de la masita, con un toque moderado de jamón, entonces déjela más gruesa). Una vez que esté bien estirada la masa, dividir en 8 porciones (tipo una pizza). Cada triángulo es un cachito. Usualmente hay que estirar un poco más cada triangulito por separado, para que el cachito quede de buen tamaño. 

      • Poner el jamón (al gusto) en la base del triángulo (suponiendo que es un triángulo isósceles) y enrollar hacia el vértice. Dos trucos para que el jamón no se desparrame: uno, antes de comenzar a enrollar, doblar los bordes como haciendo un bolsillo alrededor del jamón y enrollar hasta el final; y dos, al colocar los cachitos sobre la bandeja (previamente engrasada, o con un mat de silicón), poner el piquito hacia abajo. ¡Esto es importante! Si los ponen al revés, hay riesgo de que el cachito se abra al crecer. Dejar espacio entre cada uno, porque crecen considerablemente.
        • Los primeros cachitos salen horribles (es un hecho científico), pero ya los siguientes se van pareciendo más a los de la panadería.

      • Una vez en la bandeja, cubrirlos con la bolsa de plástico, y dejar reposar por una hora (otra eternidad más, pero insisto: vale la pena). Si viven en zonas frías, se pueden poner en un sitio tibio. Si viven en zonas calientes, en cualquier mesón sirve. 

      • Pasada la hora, o cuando sientan que han crecido, pero siguen estando firmes al tacto, precalentar el horno a 350º F / 175º C y pintar cada cachito con huevo batido usando una brocha de repostería (o los dedos, para qué engañarnos). Hay gente que los pinta con mantequilla derretida o con una mezcla de leche con azúcar. La idea de pintarlos es que la masa no se agriete mientras crece, y que se dore al hornear.
        • Update: Una lectora nos sugirió hacer una mezcla de huevo con papelón derretido (1-2 cucharadas de papelón rallado, mezclado directamente con el huevo, o disuelto en 1 cucharada de agua tibia). ¡Altamente recomendado! Ahora siempre los barnizamos con esa mezcla y no se imaginan la delicia. ¡Gracias, Veruska! 
        • Antes los barnizaba dos veces: una, antes de dejarlos reposar, y otra justo antes de hornearlos. Desde que los cubro con plástico y no con trapos húmedos, no hace falta hacerlo dos veces. Sólo antes de hornear.

      • Hornear por 12-15 minutos (hasta que se vean doraditos). Dejar enfriar en una rejilla.

      Variaciones no ortodoxas:

      • Hay gente que usa de relleno una mezcla de jamón con tocineta picada (yo no haría un 50-50, porque creo que quedaría muy grasoso y repugnante de sabor). En mi caso, uso una mezcla de picnic ham (2/3) y algún jamón ahumado (1/3).
      • Hay gente que les pone un toque de diablito (jamón endiablado) junto con el jamón (lo he hecho y les da un sabor a panadería buenísimo, pero ojo: no usar demasiado diablito).
      • También se les puede poner un poco de queso; por ejemplo, un cheddar o edam suave rallado, o incluso queso de cabra, pero hay que cerrar muy bien cada cachito, o se puede desparramar. O se puede usar jamón de pavo, aunque es mucho más seco. La combinación de jamón de pavo y queso crema queda súper bien.

      Notas extras:

      • Si 32 cachitos son demasiados, esta masa se puede congelar perfectamente. Una vez que le saquen el aire, la meten en una bolsa de plástico, la cierran bien y listo (yo le echo un chorrito de aceite a la bolsa para que luego al descongelar no se pegue). Cuando la saquen a descongelar, recuerden abrir la bolsa porque la masa va a crecer otra vez.
      Aquí pueden ver cómo congelar la masa (ya dividida en 4 y un poco aplastada, en forma de discos)
      • Por cierto, esta receta es una mezcla de varias que saqué de Internet, junto con la del pan de jamón navideño de mis padres, y ajustada según ensayo y error. Si tienen algún comentario con respecto a cantidades o método, con gusto lo incorporaré aquí.